Sunday 14 April 2024

Stamping Inspirations Blog Hop - Fun Fold


Hello and welcome to the Stamping Inkspirations Blog Hop for April. You may have arrived here from the talented Tricia Butts.

This month we are creating Fund Fold Cards. We have been challenged to create one that we have not done before. I have not been able to get into the craft room until late yesterday to create for this hop. I have had a family member in and out of hospital for over a week and some health challenges of my own. 

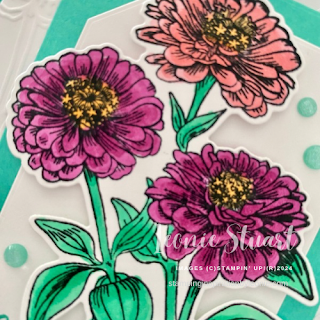
So, when I finally went in to create this card, I grabbed some stamped Simply Zinnia images and the coordinating embossoing Folder and started colouring using what I had. I love the new In Colours that are coming in the new Annual Catalogue and decided that they would be my colour palette.


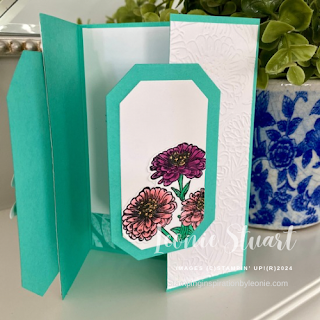
The Summer Splash card base is a standard A5 card size measuring 21cm x 14.85cm. I have scored along the 21cm edge at 5.25cm and 15.75cm and folded towards the centre. I stamped 2 of the Zinnia images in Memento™ Tuxedo Black ink on Basic White card stock and coloured in using upcoming In Colours - Petunia Pop, Pretty in Pink, Shy Shamrock and Peach Pie......You are going to love the new In Colours as much as I do!......I then die cut the images.


I cut a 10cm x 14.3cm piece of Basic White card stock and ran it the the Cut & Emboss Machine with the Zinnia 3D Embossing Folder. This is such a stunning Embossing Folder and a great addition to your collection. I cut this in half once embossed and glued it to either side of the card front. I cut two Basic White and two larger Summer Splash labels from the Countryside Corners Dies. I glued the white pieces on top of the Summer Splash pieces.

I stamped the sentiment from the upcoming Layers of Beauty stamp set in Summer Splash ink on the bottom left of the front label then used Dimesnionals to pop up the Zinnias on that piece of the Basic White label. The label was glued to the left hand flap of the card front. I secured three of the Summer Splash Shimmer Gems around the blooms....these are so pretty!


For the central label layer, I glued the Basic White piece to the larger Summer Splash label after I glued the Coloured Zinnias to the Basic White layer and used snips to trim at the edge of the Basic White label. Then glue these layers to the left hand side of the card front.

Inside the card I stamped the sentiment from the Layer of Beauty stamp set in Summer Splash ink. I cut a 1.2cm x 10cm piece of the In Colour 6" x 6" Designer Series Paper (coming in May) and glued this to the base of the Basic White card centre.


Up next on this months Blog Hop is the amazing Danielle Kassing. Click on the next button below to head to her post for more Fun Fold Fun!!


Thanks for stopping by today! You are appreciated greatly.
Product List
Paper Snips
[103579]
$19.25

Wednesday 10 April 2024

Around the World on Wednesday Blog Hop - This or That


Hello and welcome to the Around the World on Wednesday Blog Hop for April!

Each month a group of creative friends create a project for a theme. Below is an image of all of the crew and where they are from around the globe. Such a talented, friendly and wonderful group of people.


Last month I attended OnStage a Stampin' Up!® Event held in Melbourne. I loved catching up with a few of the Around the World on Wednesday Team Members whilst there. Below is a picture of Melissa Gifford, Cheryll Miller, Rochelle Laird-Smith and myself. These beautiful ladies are so talented and I love that we know each other through this amazing design team.


This year is going so quick! I can't believe we are in April already. The weather here in Australia finally cooling. We had a severe rainfall here last weekend and there were many roads cut by flooding or small landslides on the mountains that border my home town. It was the perfect opportunity to spend some time in the craft room being creative with my dog at my feet "helping".

This months challenge, This or That, had me thinking for a while. I felt I should create a simple card and then step it up, but then, I decided to make two cards with a similar layout and the same products. I chose to create my cards using new product that I chose to purchase for OnStage in Melbourne for the After Hours classes. Something new and so much fun to attend on top of the OnStage Event. The new bundle I chose is the Spotlight on Nature Bundle. The delicate images and gorgeous Dies won me over instantly. These cards are something that I imagined creating with the Bundle as soon as I saw it. Soft colours and the divine die cut circles at the centre of my card.


For my first card I decided to layer the beautiful circle die cuts and sit the fussy cut stamped and coloured images on top. The circle dies are adhered together with Dimensionals and I also used Dimensionals to add to the mat layer. I have stamped the two fussy cut images in the new Basic Beige ink before colouring in with Petal Pink and Soft Sea Foam Stampin' Blends.

For the background layer I stamped the Sketched Plaid stamp in Basic White ink on Soft Sea Foam card stock and glued that to a mat layer before adhering to the Soft Sea Foam card base. I placed three of the Petal Pink Foiled Gems around the die cut pieces on the circle diecut.

On a piece of Soft Sea Foam card stock I stamped the sentient in Soft Sea Foam ink before cutting it out with paper snips. I tied some Linen Thread in a bow and adhered it to the bottom of the sentiment piece before adhering the sentiment with Dimensionals.


For my second card I wanted to use the beautiful new neutral Basic Beige for my card base. I felt it would go well with the softness of Petal Pink and Soft Sea Foam. I decided to make a simpler and quicker version of the card above. 


The Sketched Plaid stamp was inked in Basic Beige and stamped on a Basic Beige mat layer. Then glued to the card base. I stamped the floral image on a piece of basic white card stock in Basic Beige ink before die cutting it with a circle die and colouring with  Petal Pink and Soft Sea Foam Stampin' Blends.

I stamped the sentiment in Soft Sea Foam ink on the top right hand side of the floral image. I adhered three of the Petal Pink Foiled Gems around the stamped images. Before adhering to the card base using Dimensionals I cut a 10cm length of the new Petal Pink Diagonal Trim and adhered it to the centre of the card front underneath where the circle die layer went.


Up next on this months hop is the wonderfully talented Rochelle Laird- Smith. Click on the next blog button below to head to her post.

Thanks for stopping by!

I hope to have inspired you to create two projects with some similarities as I have here. I was fun creating the one with more layers first then pairing it back for the second card.


Colour INKspiration #163


Hello and welcome to Colour INKspiration #163!

We have a gorgous colourful inspiration image for you this challenge chosen by crew member Monica Formosa. Such a beautiful and vibrant group of colours.


As I sat down to create for this challenge I was drawn to some left over strips of card stock on my desk and wanted to try the strippy technique as it would show each colour equally and look great in strips on my card front. I have many strips of card stock kept in my left over packets of card stock. Do you keep all the left over pieces? I keep most and usually find purpose for them. 


The card base is BAsic White Thick card stock. I went with white as it would keep the card looking bright and fresh. I cut a mat layer of Basic White card stock to measure 13.8cm x 9.5cm. This piece of card stock will be the base to glue the strips to. I then cut the strips of coloured card stock to 1.3mm wide and then set about gluing them to the card mat layer.

If, when gluing the strips they went over the edge of the mat layer, I waited until I finished gluing them all on before trimming them at each edge with scissors. I repeated the colour order of the strips to create a cohesive pattern. I tied a length of the Silver and White Sheer Ribbon across the centre of the mat layer and tied a bow on the right hand side. I popped the completed mat layer up using Dimensionals when adhering to the card base. This gave wonderful dimension to the card.


I stamped the sentiment from the fun Good Feelings stamp set, in Starry Sky ink on Basic Whte card stock before cutting it out with a die from the Nested Essentials Dies. These dies are a wonderful addition to your collection as they can accomodate many sentiment styles and sizes. I adhered this over the top of the ribbon on the mat layer using Dimensionals to secure.

I then added 6 of the Loose Siver Sequuins to above and below the sentiment to complete the card. I love how these sequins look a little like bubbles. Fun embellishments to finish my card.

I hope I have inspired you to create using the Strippy technique or join in the Colour INKspiration Challenges. 

Have a great week friends!


Product List
Paper Snips
[103579]
$19.25